Don't force it, there must be a screw under.
One screwdriver undoes all the screws, what a design!
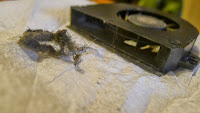
Most overheating problems are caused by an untidy fan.
STEPS
- Prepare two sheets of paper, 1 pen, 1 Philips screwdriver (better lightly magnetized), 1 thin small blade, 1 brush, some tissue paper. You workbench should be long, wide and clean. Put a tidy cloth below your computer.

- Close and fold the computer, detach the power adapter, unbutton the battery.
- Go to the back, remove the "inverted-T" part. Remind you that the three screws are attached to that piece and can't be removed from it. You can now see your memory chips, hard-drive, Wi-Fi chip with two wires (black and white), CMOS battery. Remove wifi wires.
- Now draw a map of all the screws on the back, remove all the screws and place them exactly where they shall be on the map.

click to enlarge
- Take the CD-drive out (it is now free). You see three screws on the rim, draw them on the map, and do the same as for the others.
- Take the blade and slide it into the narrow space between the border of the keyboard and the metal shell. Lift it and move around to take off the border. It is locked by plastic hooks so you might hear some crack sound, it is okay. This piece is attached to the motherboard by the flat wires (power button). Lift the plastic lock to take the flat wire off. Now you get rid of it.

- Remove the keyboard afterwards, there are three screws so draw a small map for the keyboard too. The flat wire for the keyboard is right under it, so when you are done with screws, tilt the keyboard, undo the wire as in the last step.
- Here comes the piece of metal shell, it is connected to the motherboard since there is the touch-pad. Also there is the wifi wire dangling, so we'd better take the wifi wire out of its channel. Draw another map, undo all the screws as before. Use the blade again to remove the shell away. It is locked by plastic hooks too, so again there are some cracks and this time it is bit harder. But if you really feel it is tough, you might have forgotten some drew. When you are done, take off the touchpad wire and remove the whole piece.

- We don't need to remove the motherboard to take out the fan. Just draw a small map for the fan, first take its power wire off at the bottom. Remove the screws. There is one screw around for the main power socket, undo that as well, just to gain some space.
- Take the fan out and clean it with the tissue paper and the brush (you can open it, there are a couple of small screws on the back). Clean the heat sink too.

- Now do the reverse in the inverted order.


No comments:
Post a Comment