Saturday, October 19, 2013

Fan Cleaning: DELL INSPIRON 1564

Don't force it, there must be a screw under.
One screwdriver undoes all the screws, what a design!
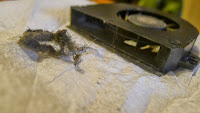
Most overheating problems are caused by an untidy fan.

STEPS

  1. Prepare two sheets of paper, 1 pen, 1 Philips screwdriver (better lightly magnetized), 1 thin small blade, 1 brush, some tissue paper. You workbench should be long, wide and clean. Put a tidy cloth below your computer.
  2. Close and fold the computer, detach the power adapter, unbutton the battery.
  3. Go to the back, remove the "inverted-T" part. Remind you that the three screws are attached to that piece and can't be removed from it. You can now see your memory chips, hard-drive, Wi-Fi chip with two wires (black and white), CMOS battery. Remove wifi wires.
  4. Now draw a map of all the screws on the back, remove all the screws and place them exactly where they shall be on the map.

    click to enlarge

  5. Take the CD-drive out (it is now free). You see three screws on the rim, draw them on the map, and do the same as for the others.
  6. Take the blade and slide it into the narrow space between the border of the keyboard and the metal shell. Lift it and move around to take off the border. It is locked by plastic hooks so you might hear some crack sound, it is okay. This piece is attached to the motherboard by the flat wires (power button). Lift the plastic lock to take the flat wire off. Now you get rid of it.
  7. Remove the keyboard afterwards, there are three screws so draw a small map for the keyboard too. The flat wire for the keyboard is right under it, so when you are done with screws, tilt the keyboard, undo the wire as in the last step.
  8. Here comes the piece of metal shell, it is connected to the motherboard since there is the touch-pad. Also there is the wifi wire dangling, so we'd better take the wifi wire out of its channel. Draw another map, undo all the screws as before. Use the blade again to remove the shell away. It is locked by plastic hooks too, so again there are some cracks and this time it is bit harder. But if you really feel it is tough, you might have forgotten some drew. When you are done, take off the touchpad wire and remove the whole piece.
  9. We don't need to remove the motherboard to take out the fan. Just draw a small map for the fan, first take its power wire off at the bottom. Remove the screws. There is one screw around for the main power socket, undo that as well, just to gain some space.
  10. Take the fan out and clean it with the tissue paper and the brush (you can open it, there are a couple of small screws on the back). Clean the heat sink too.
  11. Now do the reverse in the inverted order.

Friday, October 11, 2013

Everyday Shell Scripts

  • Rename the extensions of all files,

    for FILE in *.foo ; 
    do NEWFILE=`echo $FILE | sed 's/.foo/.bar/g'` ;
     mv "$FILE" $NEWFILE ; 
    done
  • Test if a variable is set (pay attention to the space, they can't be eliminated),

    if [ ! -z "$var" ]; then
      echo "var exists"
    fi
  • Test if a file exists,

    if [ -f "$file" ]; then
      echo "file exists"
    fi
  • Copy one file to the clipboard (install xclip first)

    cat file | xclip -selection c
  • Paste clipboard to a file

    xclip -o > file
  • Define a function

    foo(){
      echo "FUNCTION"
    }
    fun=$(foo)
    
  • The most recent foreground pipeline exit status: $?

    if [ $? -eq -1 ]
      then
      exit 1
    fi 
  • Several ways of for loop controlled by a var

    for I in {1..10}; do echo $I; done
    for I in 1 2 3 4 5 6 7 8 9 10; do echo $I; done
    for I in $(seq 1 10); do echo $I; done
    for ((I=1; I <= 10 ; I++)); do echo $I; done
  • Generate ticks in (-4pi, 4pi):

    for i in $(seq -4 4); do b=`echo "$i * 3.14159" | bc`; echo -ne $b","; done; 

    This is useful for PGFplots for trigonometric ticks,

    xtick={-12.56636,-9.42477,-6.28318,-3.14159,0,
    3.14159,6.28318,9.42477,12.56636},
    xticklabels={
            $-4\pi$, $-3\pi$, $-2\pi$, $-\pi$, $0$,
            $\pi$, $2\pi$, $3\pi$, $4\pi$
     }
  • Convert all jpeg files and save them as png files.

    for file in *.jpg;do 
      newfile=`echo $file | sed 's/.jpg/.png/g'`;
      gm convert -quality 60 $file $newfile;
    done
  • Compress all jpeg files.

    mkdir new
    for file in *.jpg;do 
      newfile="new/$file";
      gm convert -quality 60 $file $newfile;
    done

Friday, October 4, 2013

LaTeX Typesetting Hacks (Continuously Updating)

This list of knowledge is a collection of common problems encountered in everyday typesetting. The solution is either seen by reading package manuals of LaTeX related websites. But here I would like to give a list of clear reference (let's do it in factory mode). I've evaluated different solutions and try to make the hacks as simple as possible.

  • By default, hyperref packages creates a colorful border for links. To remove it,

    %remove colorful borders on links without updating the package
    \hypersetup{%
        pdfborder = {0 0 0}
    }
  • How to use "List of Algorithms" as toc title and "Algorithms" for single title instead of "List of Listings" while using listings package?

    %listing customization
    \renewcommand{\lstlistingname}{Algorithm}% Listing -> Algorithm
    \renewcommand{\lstlistlistingname}{List of \lstlistingname s}% List of Listings -> List of Algorithms
  • How not to break hypen in bibliography?

    %bibliography no break hypen
    \makeatletter
    \newcommand*\bibhyphen{\hbox{-}\nobreak\hskip\z@skip}
    \makeatother
    \newcommand*\bibdash{\rule[0.48ex]{2em}{0.14ex}\space}
  • How to add bibliography to the table of contents?

    \usepackage[nottoc]{tocbibind} %add bibliography to toc
  • How to use "bibliography" instead of "references"?

    \renewcommand{\refname}{Bibliography}
  • How to enlarge margin paragraph width without using geometry package since it rewrites all the default layout values?

    %set twice as default
    \setlength{\marginparwidth}{2\marginparwidth}
  • How to center texts?

    %maybe you are looking for \vspace{2cm} too?
    \begin{center}
    This is centered text.
    \end{center}
  • How to give remarks in red?

    \usepackage{color}
    %you can define a macro \remark in the preamble
    \newcommand{\remark}[1]{{\color{red}REMARK: #1}}
    %then in the document
    \remark{This is a remark in red.}
  • To include Chinese/Japanese/Korean letters or characters along with pdflatex, use CJK package. Alternatively, one can choose xelatex. See CJK Doc. Notice CJK env uses two extra options to specify the encodings and font family. One can check out supported font family by checking the folder /usr/share/texmf/tex/latex/CJK/UTF8 or similar. If the font parameter is empty, the default value given in CJK.enc will be selected. On my machine, I have c70bkai.fd installed in that folder. One can also refer install CJK support to see how to manually install a CJK font to the tex tree.

    \usepackage{CJK}
    \begin{CJK}{UTF8}{bkai}
    漢字
    \end{CJK}
    %to merge CJK with another environment, embed that environment within CJK, such as
    \begin{CJK}{UTF8}{bkai}
    \marginpar{
    丁香
    }
    \end{CJK}
  • An example of including a centered figure with caption and label.

    \usepackage{grahpicx}
    \begin{figure}[ht]
    \centering
    \includegraphics{pic.jpg}
    \caption{sample picture}
    \label{fig:sample-pic}
    \end{figure}
  • How to put two pictures side by side with each of its own caption and label?

    \usepackage{subfigure}
    \begin{figure}[ht]
    \centering
    \subfigure[Caption a]{
    \includegraphics[width=.45\linewidth]{img1.png}
    \label{fig:imga}
    }
    \hspace{.2in}
    \subfigure[Caption b]{
    \includegraphics[width=.45\linewidth]{img2.png}
    \label{fig:imgb}
    }
    \caption{Two figures}%
    \label{fig:2-fig}
    \end{figure}
  • How to introduce plain codes?

    \usepackage{verbatim}
    \begin{verbatim}
    int sched_setscheduler(pid_t pid, int policy,
                           const struct sched_param *param);
    \end{verbatim}
  • How to include "Acknowledgements"?

    %do it as a section
    \section*{Acknowledgements}
    \addcontentsline{toc}{section}{Acknowledgements}
      
  • Customize figure caption. This caption will remove "Fig.", and the separator is set as space instead of the default colon.

    \renewcommand{\figurename}{}
    \usepackage[labelsep=space]{caption}